01. 클라우드 컴퓨팅
우리가 제작한 Django 서비스는 1년 365일 24시간 돌아가야 함
즉, 우리는 안정적으로 항상 켜져 있는 컴퓨팅 자원이 필요
01. 클라우드 컴퓨팅: 쉽게 말하면 물리적 서버를 가상화 시켜서 인터넷 서비스로 제공하는 것
아래와 같이 크게 세 가지로 분류할 수 있음.
IaaS(Infrastructure as a Service)
- 물리적인 컴퓨팅 자원을 가상화 해서 제공하는 서비스
- 모두 설정을 해줘야하므로 마음대로 커스텀 할 수 있음 (장점이자 단점)
- Amazon Web Service, Microsoft Azure, Google Compute Engine
PaaS(Platform as a Service)
- 플랫폼을 가상화 해서 제공하는 서비스
- 인프라에 대한 관리 없이 개발에 집중하여 빠른 속도로 개발할 수 있음
- Heroku, AWS Elastic Beanstalk, PythonAnyWhere
SaaS(Sofrware as a Service)
- 서비스형 소프트웨어로 컴퓨터에 설치하고 사용하던 이전의 소프트웨어와 달리 인터넷 접속을 통해 바로 서비스를 사용할 수 있음
- 모든 서비스를 맡기고 비지니스에 집중할 수 있음
- Dropbox, Notion, Slack
AWS를 이용해서 배포하기
AWS 계정 생성 (https://aws.amazon.com/ko/)
- 기본적으로 여러 자원에 대해 프리티어를 제공하여 정해진 사용량까지 무료로 체험 가능
- 이후로는 자동으로 과금이 들어가기 때문에 사용하지 않을거라면 자원을 해지하는 것이 필요!


AWS EC2 인스턴스 생성


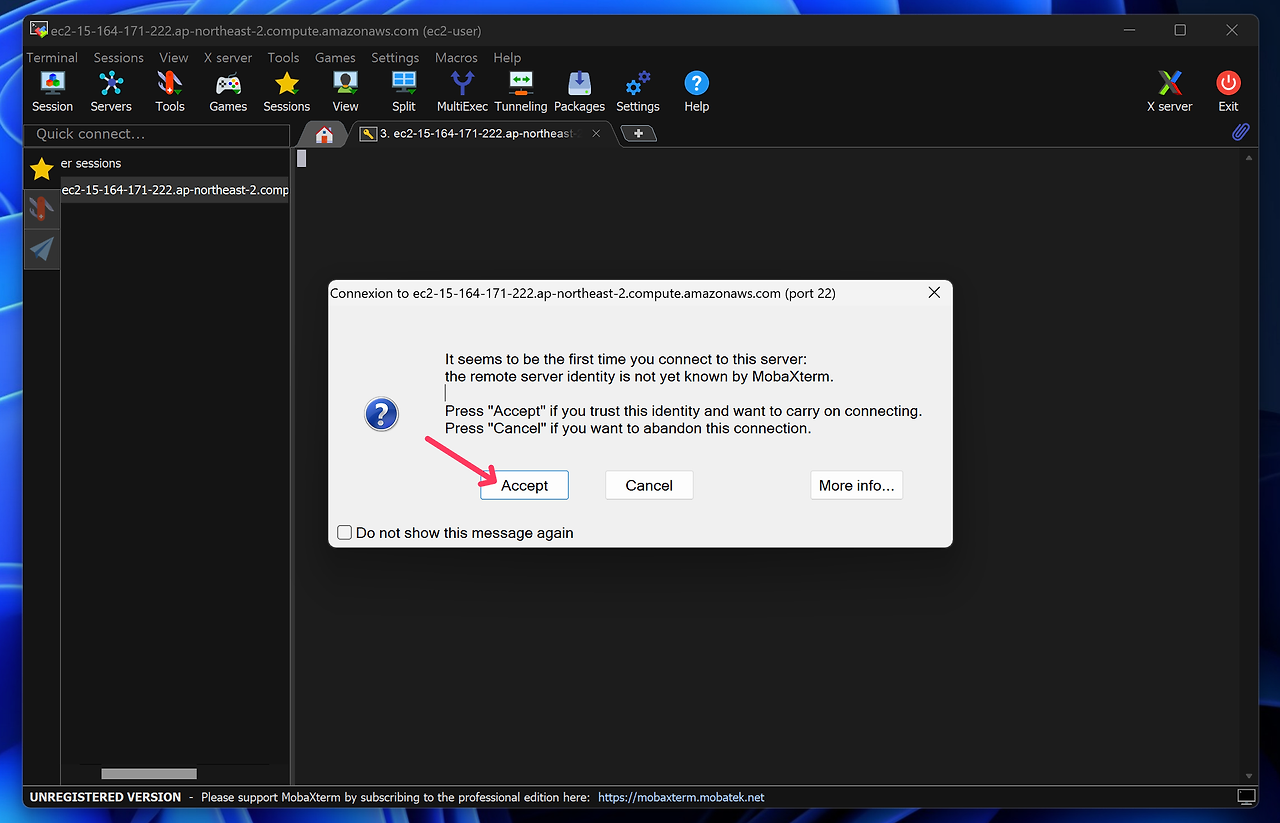
AWS EC2 인스턴스 접속
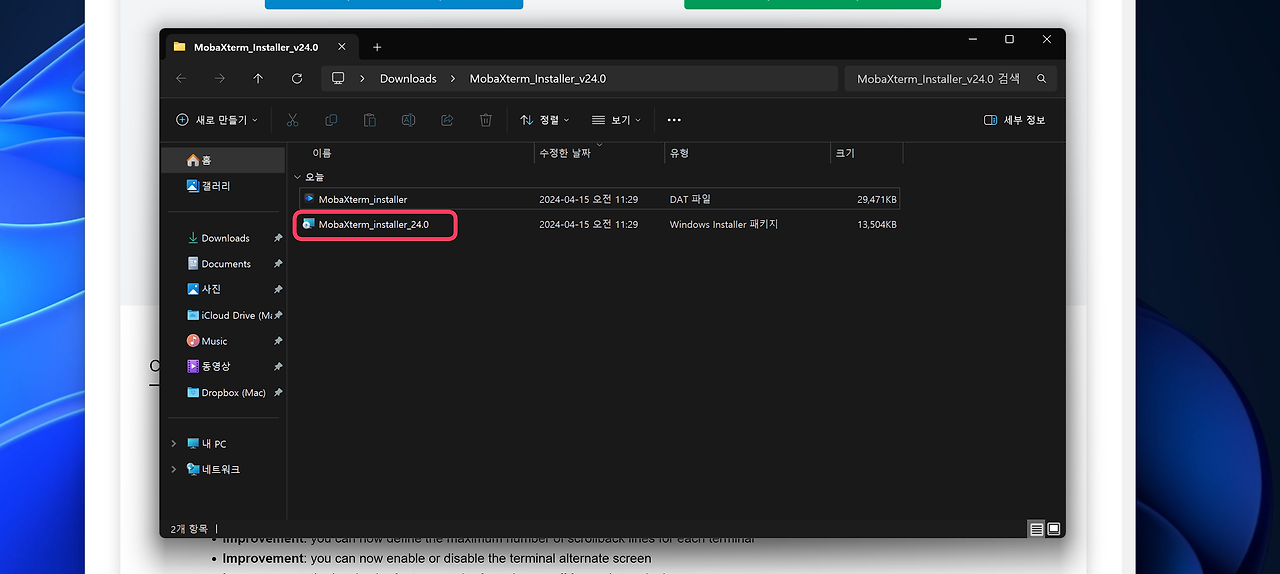
- 모바엑스텀(MobaXTerm) 설치: https://mobaxterm.mobatek.net/
MobaXterm free Xserver and tabbed SSH client for Windows
The ultimate toolbox for remote computing - includes X server, enhanced SSH client and much more!
mobaxterm.mobatek.net


Remote host : AWS의 퍼블릭 DNS 입력

- Specify username 체크 후 ubuntu 입력
- Advanced SSH settings 선택후 이전에 생성했던 .pem 파일 선택


Github에 코드 올리기
- 왜 해야하죠?
- 우리 컴퓨터가 아니라 임대한 컴퓨터(EC2)에 코드를 옮겨야 하니까 !
- repository 생성후 push 해주세요 🙂
- requirements.txt 최신 버전으로 다시 한 번 freeze 하기 !
- .gitignore 꼭 잘 설정하기 !
추천 gitignore
# Created by https://www.toptal.com/developers/gitignore/api/windows,macos,python,venv,visualstudiocode,django,pycharm
# Edit at https://www.toptal.com/developers/gitignore?templates=windows,macos,python,venv,visualstudiocode,django,pycharm

### Custom ###
config.py

### Django ###
*.log
*.pot
*.pyc
__pycache__/
local_settings.py
db.sqlite3
db.sqlite3-journal
media

# If your build process includes running collectstatic, then you probably don't need or want to include staticfiles/
# in your Git repository. Update and uncomment the following line accordingly.
# <django-project-name>/staticfiles/

### Django.Python Stack ###
# Byte-compiled / optimized / DLL files
*.py[cod]
*$py.class

# C extensions
*.so

# Distribution / packaging
.Python
build/
develop-eggs/
dist/
downloads/
eggs/
.eggs/
lib/
lib64/
parts/
sdist/
var/
wheels/
share/python-wheels/
*.egg-info/
.installed.cfg
*.egg
MANIFEST

# PyInstaller
#  Usually these files are written by a python script from a template
#  before PyInstaller builds the exe, so as to inject date/other infos into it.
*.manifest
*.spec

# Installer logs
pip-log.txt
pip-delete-this-directory.txt

# Unit test / coverage reports
htmlcov/
.tox/
.nox/
.coverage
.coverage.*
.cache
nosetests.xml
coverage.xml
*.cover
*.py,cover
.hypothesis/
.pytest_cache/
cover/

# Translations
*.mo

# Django stuff:

# Flask stuff:
instance/
.webassets-cache

# Scrapy stuff:
.scrapy

# Sphinx documentation
docs/_build/

# PyBuilder
.pybuilder/
target/

# Jupyter Notebook
.ipynb_checkpoints

# IPython
profile_default/
ipython_config.py

# pyenv
#   For a library or package, you might want to ignore these files since the code is
#   intended to run in multiple environments; otherwise, check them in:
# .python-version

# pipenv
#   According to pypa/pipenv#598, it is recommended to include Pipfile.lock in version control.
#   However, in case of collaboration, if having platform-specific dependencies or dependencies
#   having no cross-platform support, pipenv may install dependencies that don't work, or not
#   install all needed dependencies.
#Pipfile.lock

# poetry
#   Similar to Pipfile.lock, it is generally recommended to include poetry.lock in version control.
#   This is especially recommended for binary packages to ensure reproducibility, and is more
#   commonly ignored for libraries.
#   https://python-poetry.org/docs/basic-usage/#commit-your-poetrylock-file-to-version-control
#poetry.lock

# pdm
#   Similar to Pipfile.lock, it is generally recommended to include pdm.lock in version control.
#pdm.lock
#   pdm stores project-wide configurations in .pdm.toml, but it is recommended to not include it
#   in version control.
#   https://pdm.fming.dev/#use-with-ide
.pdm.toml

# PEP 582; used by e.g. github.com/David-OConnor/pyflow and github.com/pdm-project/pdm
__pypackages__/

# Celery stuff
celerybeat-schedule
celerybeat.pid

# SageMath parsed files
*.sage.py

# Environments
.env
.venv
env/
venv/
ENV/
env.bak/
venv.bak/

# Spyder project settings
.spyderproject
.spyproject

# Rope project settings
.ropeproject

# mkdocs documentation
/site

# mypy
.mypy_cache/
.dmypy.json
dmypy.json

# Pyre type checker
.pyre/

# pytype static type analyzer
.pytype/

# Cython debug symbols
cython_debug/

# PyCharm
#  JetBrains specific template is maintained in a separate JetBrains.gitignore that can
#  be found at https://github.com/github/gitignore/blob/main/Global/JetBrains.gitignore
#  and can be added to the global gitignore or merged into this file.  For a more nuclear
#  option (not recommended) you can uncomment the following to ignore the entire idea folder.
#.idea/

### macOS ###
# General
.DS_Store
.AppleDouble
.LSOverride

# Icon must end with two \r
Icon


# Thumbnails
._*

# Files that might appear in the root of a volume
.DocumentRevisions-V100
.fseventsd
.Spotlight-V100
.TemporaryItems
.Trashes
.VolumeIcon.icns
.com.apple.timemachine.donotpresent

# Directories potentially created on remote AFP share
.AppleDB
.AppleDesktop
Network Trash Folder
Temporary Items
.apdisk

### macOS Patch ###
# iCloud generated files
*.icloud

### PyCharm ###
# Covers JetBrains IDEs: IntelliJ, RubyMine, PhpStorm, AppCode, PyCharm, CLion, Android Studio, WebStorm and Rider
# Reference: https://intellij-support.jetbrains.com/hc/en-us/articles/206544839

# User-specific stuff
.idea/**/workspace.xml
.idea/**/tasks.xml
.idea/**/usage.statistics.xml
.idea/**/dictionaries
.idea/**/shelf

# AWS User-specific
.idea/**/aws.xml

# Generated files
.idea/**/contentModel.xml

# Sensitive or high-churn files
.idea/**/dataSources/
.idea/**/dataSources.ids
.idea/**/dataSources.local.xml
.idea/**/sqlDataSources.xml
.idea/**/dynamic.xml
.idea/**/uiDesigner.xml
.idea/**/dbnavigator.xml

# Gradle
.idea/**/gradle.xml
.idea/**/libraries

# Gradle and Maven with auto-import
# When using Gradle or Maven with auto-import, you should exclude module files,
# since they will be recreated, and may cause churn.  Uncomment if using
# auto-import.
# .idea/artifacts
# .idea/compiler.xml
# .idea/jarRepositories.xml
# .idea/modules.xml
# .idea/*.iml
# .idea/modules
# *.iml
# *.ipr

# CMake
cmake-build-*/

# Mongo Explorer plugin
.idea/**/mongoSettings.xml

# File-based project format
*.iws

# IntelliJ
out/

# mpeltonen/sbt-idea plugin
.idea_modules/

# JIRA plugin
atlassian-ide-plugin.xml

# Cursive Clojure plugin
.idea/replstate.xml

# SonarLint plugin
.idea/sonarlint/

# Crashlytics plugin (for Android Studio and IntelliJ)
com_crashlytics_export_strings.xml
crashlytics.properties
crashlytics-build.properties
fabric.properties

# Editor-based Rest Client
.idea/httpRequests

# Android studio 3.1+ serialized cache file
.idea/caches/build_file_checksums.ser

### PyCharm Patch ###
# Comment Reason: https://github.com/joeblau/gitignore.io/issues/186#issuecomment-215987721

# *.iml
# modules.xml
# .idea/misc.xml
# *.ipr

# Sonarlint plugin
# https://plugins.jetbrains.com/plugin/7973-sonarlint
.idea/**/sonarlint/

# SonarQube Plugin
# https://plugins.jetbrains.com/plugin/7238-sonarqube-community-plugin
.idea/**/sonarIssues.xml

# Markdown Navigator plugin
# https://plugins.jetbrains.com/plugin/7896-markdown-navigator-enhanced
.idea/**/markdown-navigator.xml
.idea/**/markdown-navigator-enh.xml
.idea/**/markdown-navigator/

# Cache file creation bug
# See https://youtrack.jetbrains.com/issue/JBR-2257
.idea/$CACHE_FILE$

# CodeStream plugin
# https://plugins.jetbrains.com/plugin/12206-codestream
.idea/codestream.xml

# Azure Toolkit for IntelliJ plugin
# https://plugins.jetbrains.com/plugin/8053-azure-toolkit-for-intellij
.idea/**/azureSettings.xml

### Python ###
# Byte-compiled / optimized / DLL files

# C extensions

# Distribution / packaging

# PyInstaller
#  Usually these files are written by a python script from a template
#  before PyInstaller builds the exe, so as to inject date/other infos into it.

# Installer logs

# Unit test / coverage reports

# Translations

# Django stuff:

# Flask stuff:

# Scrapy stuff:

# Sphinx documentation

# PyBuilder

# Jupyter Notebook

# IPython

# pyenv
#   For a library or package, you might want to ignore these files since the code is
#   intended to run in multiple environments; otherwise, check them in:
# .python-version

# pipenv
#   According to pypa/pipenv#598, it is recommended to include Pipfile.lock in version control.
#   However, in case of collaboration, if having platform-specific dependencies or dependencies
#   having no cross-platform support, pipenv may install dependencies that don't work, or not
#   install all needed dependencies.

# poetry
#   Similar to Pipfile.lock, it is generally recommended to include poetry.lock in version control.
#   This is especially recommended for binary packages to ensure reproducibility, and is more
#   commonly ignored for libraries.
#   https://python-poetry.org/docs/basic-usage/#commit-your-poetrylock-file-to-version-control

# pdm
#   Similar to Pipfile.lock, it is generally recommended to include pdm.lock in version control.
#   pdm stores project-wide configurations in .pdm.toml, but it is recommended to not include it
#   in version control.
#   https://pdm.fming.dev/#use-with-ide

# PEP 582; used by e.g. github.com/David-OConnor/pyflow and github.com/pdm-project/pdm

# Celery stuff

# SageMath parsed files

# Environments

# Spyder project settings

# Rope project settings

# mkdocs documentation

# mypy

# Pyre type checker

# pytype static type analyzer

# Cython debug symbols

# PyCharm
#  JetBrains specific template is maintained in a separate JetBrains.gitignore that can
#  be found at https://github.com/github/gitignore/blob/main/Global/JetBrains.gitignore
#  and can be added to the global gitignore or merged into this file.  For a more nuclear
#  option (not recommended) you can uncomment the following to ignore the entire idea folder.

### Python Patch ###
# Poetry local configuration file - https://python-poetry.org/docs/configuration/#local-configuration
poetry.toml

# ruff
.ruff_cache/

# LSP config files
pyrightconfig.json

### venv ###
# Virtualenv
# http://iamzed.com/2009/05/07/a-primer-on-virtualenv/
[Bb]in
[Ii]nclude
[Ll]ib
[Ll]ib64
[Ll]ocal
[Ss]cripts
pyvenv.cfg
pip-selfcheck.json

### VisualStudioCode ###
.vscode/*
!.vscode/settings.json
!.vscode/tasks.json
!.vscode/launch.json
!.vscode/extensions.json
!.vscode/*.code-snippets

# Local History for Visual Studio Code
.history/

# Built Visual Studio Code Extensions
*.vsix

### VisualStudioCode Patch ###
# Ignore all local history of files
.history
.ionide

### Windows ###
# Windows thumbnail cache files
Thumbs.db
Thumbs.db:encryptable
ehthumbs.db
ehthumbs_vista.db

# Dump file
*.stackdump

# Folder config file
[Dd]esktop.ini

# Recycle Bin used on file shares
$RECYCLE.BIN/

# Windows Installer files
*.cab
*.msi
*.msix
*.msm
*.msp

# Windows shortcuts
*.lnk

# End of https://www.toptal.com/developers/gitignore/api/windows,macos,python,venv,visualstudiocode,django,pycharm- config.py 올리면 안된다 !
- 가상 환경 폴더도 꼭 제외하자 ! (venv , .venv 등)
AWS EC2 기본 설정

- IaaS 이므로 우리는 인프라를 서비스 받고 있음
- 모든 설정을 직접해주는 것이 필요
기본 프로그램 설치 및 설정
sudo apt-get update # 패키지 정보 업데이트
sudo apt-get install python3-pip

이후 위와같은 창이 나오면 똑같이 하면 됨

git clone {repository 주소}

패키지 설치하기
- 우리 Django 프로젝트를 실행하기 위해서는 다양한 패키지가 필요
- 우리에게 필요한 패키지는 requirements.txt 안에 버전과 함께 모두 명시됨
sudo apt-get install build-essential libpq-dev -yrequirements 설치시 필요할 수 있는 시스템 패키지 사전 설치 (중간에 나오는 창에서는 모두 OK로 진행)
pip install -r requirements.txtrequirements를 참고하며 모든 패키지를 버전에 맞게 설치
Django 실행해보고 설정하기
config(env) 파일
❗ 실제 환경에서는 config(env)를 설정하는 다양한 방법이 존재
지금처럼 파일 형태를 가지고 있는 케이스도 있지만, 환경 변수 설정이나 인프라의 지원을 받는등의 방법도 있음
이번에 우리는 직접 필요한 파일을 만들어서 설정
cd ~
touch config.py
- (2) vi를 사용해서 편집
- vi 편집기는 Shell 환경해서 문서를 편집할 수 있는 도구로 모드 전환을 통해 간단하게 입력 및 수정을 할 수 있음
vi config.py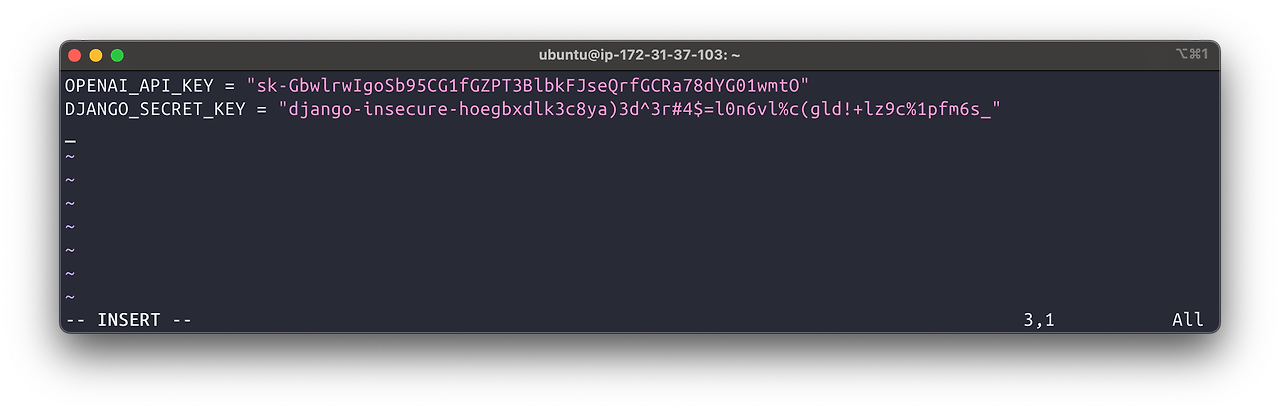
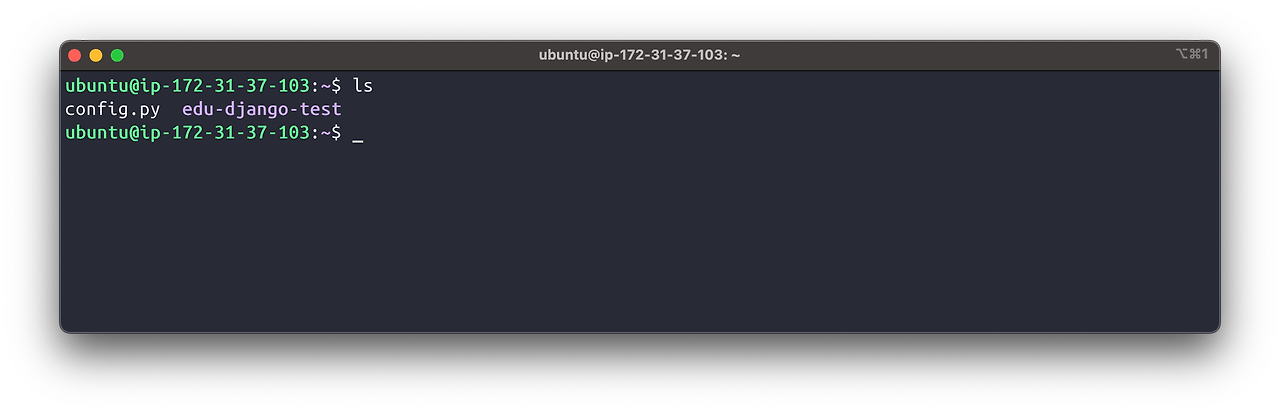
- 지금 위치에 config.py 파일이 있으면 Django는 실행할 수 없다.
- 우리가 원래 원하는 위치인 api_pjt/config.py 로 옮겨주어야한다.
edu-django-test/api_pjt/config.py 이렇게 되어야한다.
(여러분의 repositofy 폴더에 맞게 입력해야겠죠)
지금은 각 repository 폴더가 있으니까 (위의 경우 edu-django-test)
cd ~ # 홈 위치에서cp config.py edu-django-test/api_pjt # config.py 파일을 원하는 위치로 복사

db.sqlite3 파일은 gitignore에 의해 제외되고 있습니다.
그렇기 때문에 현재 migration 파일은 있으나,
데이터베이스에 반영이 안 된 상태이기에 다시 migration이 필요합니다!
python3 manage.py migrate*makemigrations 명령은 배포 인스턴스에서 하지 않습니다!
필요할 경우 로컬에서 모두 작업해서 migration 파일을 생성한 뒤,
해당 변경 사항을 받아와서 적용해야 합니다.
- superuser 생성
python3 manage.py createsuperuser
포트 개방하고 접속해보기
- 이번엔 아래 명령어를 이용해서 서버를 실행해 봅시다
python3 manage.py runserver 0:8000- 0 : 이 서버에 접속 할 수 있도록 함
- 8000 : 8000번 포트로 접속을 허용
그리고 EC2 IP 주소를 이용해서 접속해보면?
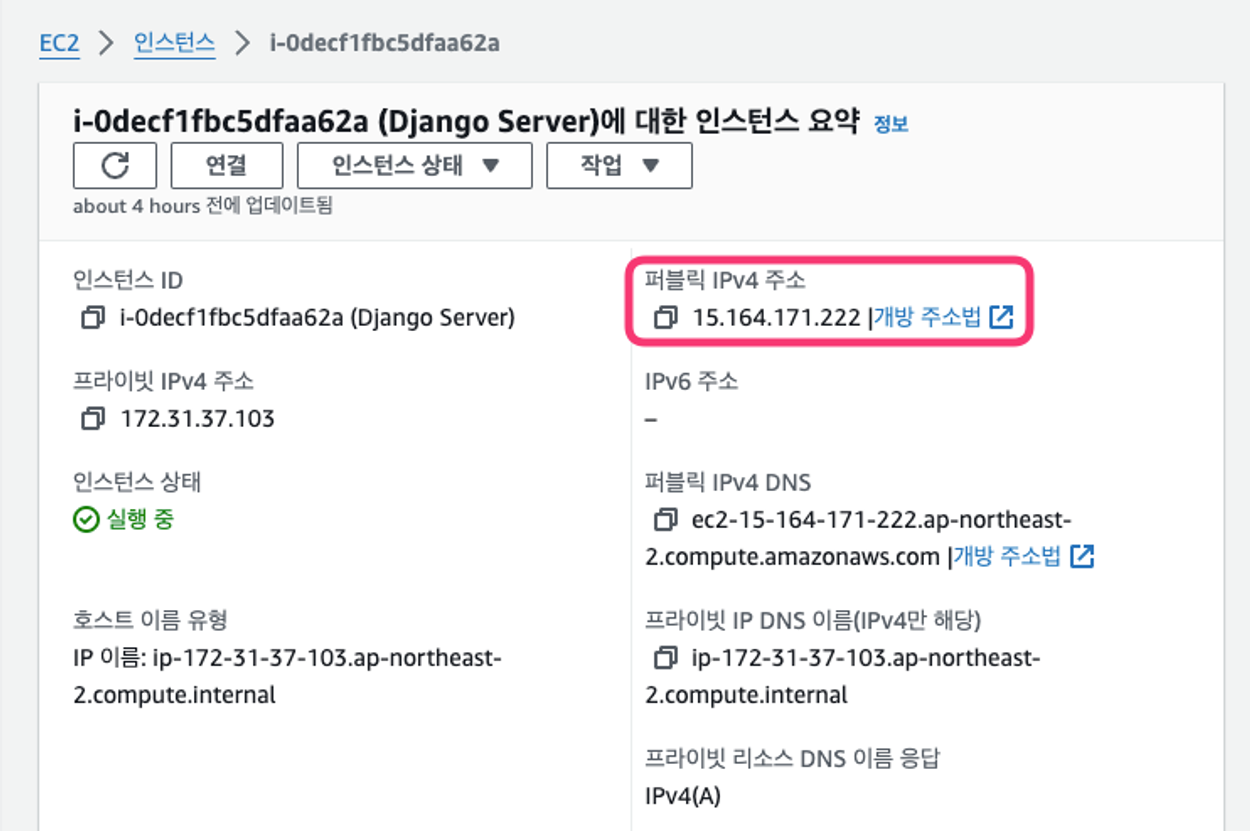

아직 EC2에서 8000 포트로의 접속을 허용해주지 않았기 때문
포트 열어주기
- EC2 인스턴스 아래의 보안 → 보안 그룹 → 인바운드 규칙 편집
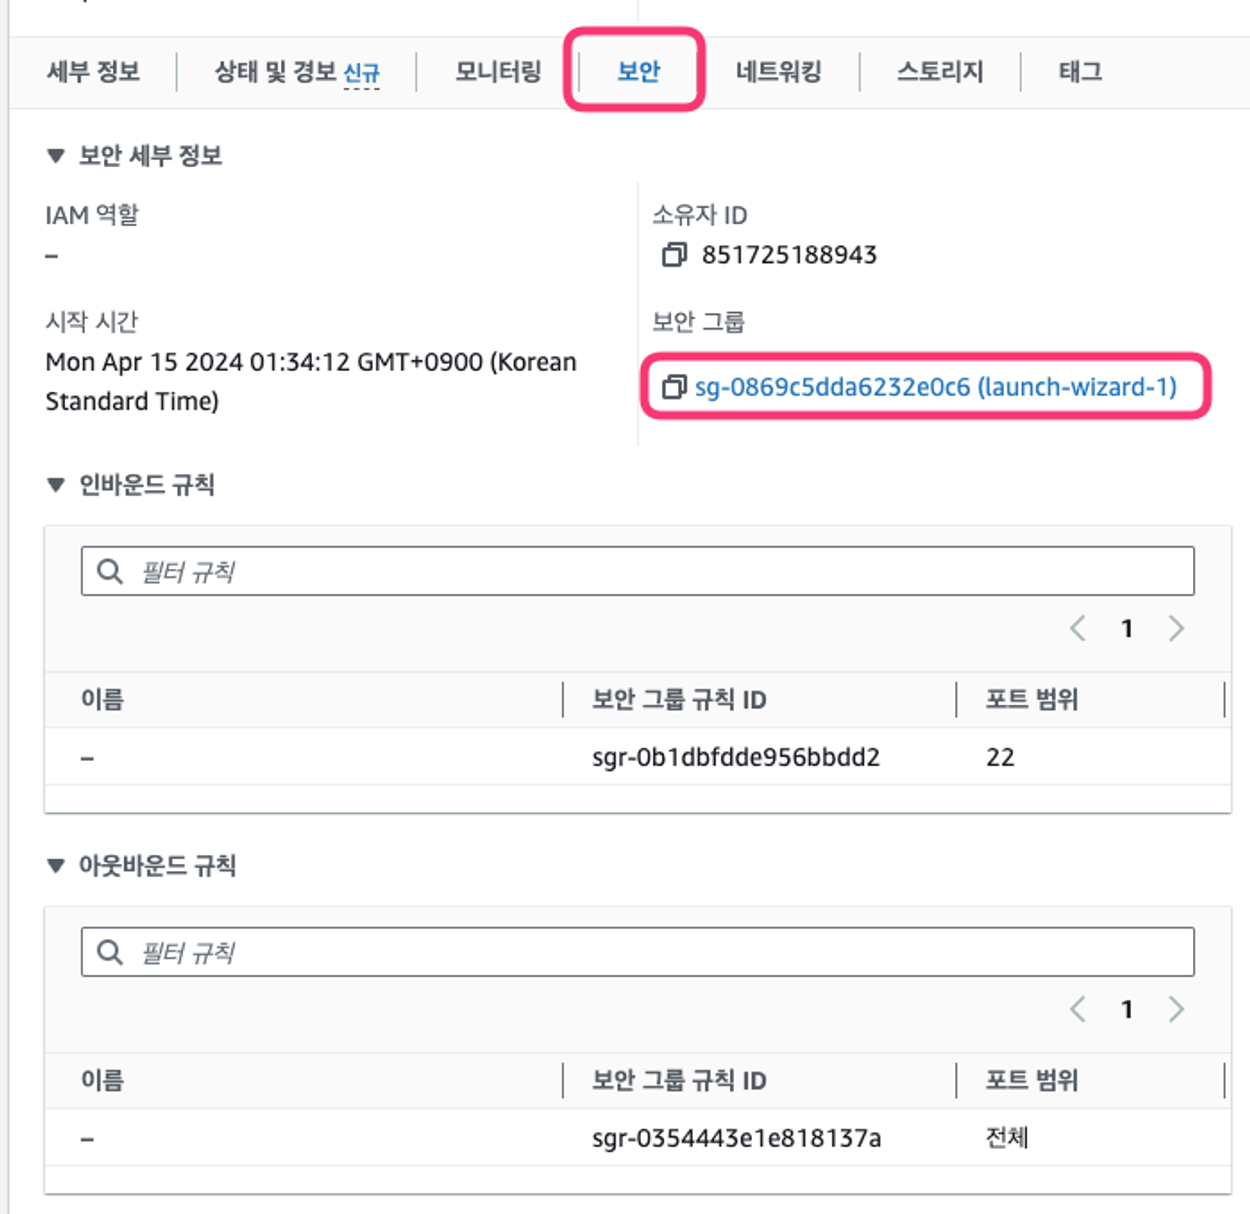

인바운드 : 우리 EC2 인스턴스로 들어오는 규칙
아웃바운드 : EC2에서 밖으로 나가는 규칙


그리고 다시 접속해보면 !

ALLOWED_HOSTS 설정하고 재배포 하기
- Django는 프로젝트가 실행되는 호스트를 등록하는 보안기능을 제공


- 코드를 수정했으니 다시 push를 하고, EC2로 가서 다시 pull


개발 서버에서 벗어나기
- 지금까지 Django 서버를 실행할 때는 계속 Django에 내장된 개발 서버를 사용했지만, 배포 환경에서는 더 효율적인 처리를 할 수 있는 환경이 필요
- 일반적으로 Django는 Gunicorn과 Nginx를 사용해서 배포 환경을 구성
구조 이야기
📕 사실 우리의 Django는 ‘웹서버’가 아니에요.
정확하게 말하면 Web Application이며 Nginx가 웹 서버이고,
이 둘 사이를 연결해주는 매개체가 WSGI에 해당하는 Gunicorn입니다!
Web Server <-> WSGI <-> Web Application
Nginx <-> Gunicorn <-> Django
Web Application?
- 식당으로 따지면 요리사
- 요청에 따라서 다양한 요청을 직접 처리해서 동적인 응답을 만들어내는 주체
WSGI(Web Server Gateway Interface)
- 식당으로 따지면 서빙 직원
- HTTP와 Python으로 동작하는 Django간의 연결을 담당하는 인터페이스
- HTTP로 들어오는 네트워크 신호를 Python Application으로 변환해서 전달해주는 역할을 한다. HTTP 네트워크 신호는 Python과 아무런 연관성이 없기때문에 이러한 중간 인터페이스가 필요한 것.
- 이전의 개발 서버는 Django에 내장되어 있는 간단한 WSGI를 사용한것
Web Server?
- 식당으로 따지면 안내 데스크(출입구)
- 클라이언트의 HTTP 요청을 받아서 정적 파일을 바로 제공하거나 로드밸런싱(여러대의 서버가 있을경우 부하를 분산시켜 트래픽을 처리하는 기술)등을 앞쪽에서 담당하여 전체적인 시스템의 가용성을 증가시키는 역할
gunicorn 설치 및 설정하기

$ sudo apt-get update
$ sudo apt-get install gunicorn
설치 과정에서 나오는 설정들은 tab을 이용해서 모두 OK로 설치
Gunicorn 실행하기
- manage.py 가 있는 폴더에서 실행해 줌
gunicorn --bind 0:8000 api_pjt.wsgi:application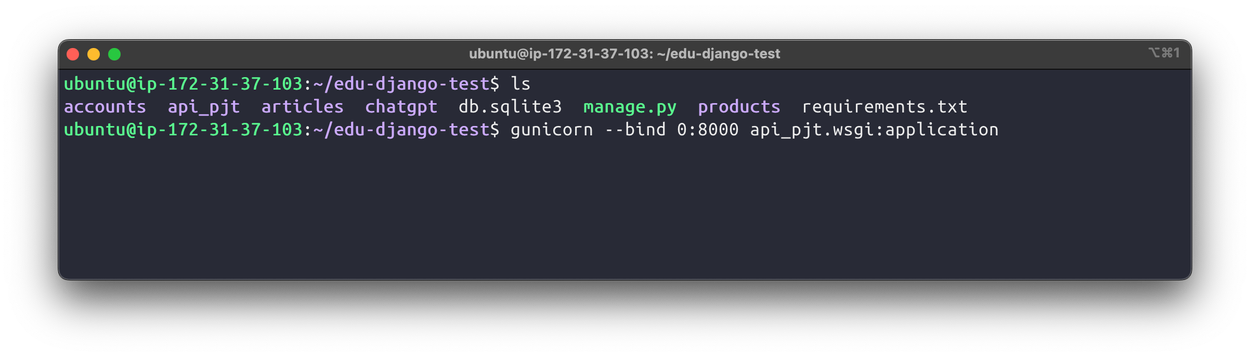
다시 웹브라우저로 들어가봐도 잘 동작하는 것을 볼 수 있음.

그런데 /admin/ 으로 들어가보면?

정적 파일이 제공되고 있지 않기때문 ! → Nginx에서 처리 예정
정적 파일 다루기
정적파일 설정 및 한 곳으로 모으기
- settings.py에 static 파일들이 위치할 경로와 url을 지정해 줍니다.
...
STATIC_URL = "static/"
STATIC_ROOT = BASE_DIR / "static"
...
settings.py
- 코드변경 → commit → puth 이후 EC2에서 pull !
- 정적파일 한 곳에 모으기
python3 manage.py collectstatic
Nginx 설치 및 설정하기
sudo apt install nginx -y중간에 멈추어서 물어보는 구간에서는 엔터를 이용해서 모두 넘겨주며 설치
/etc/nginx/stites-available 로 이동해서 설정을 등록해 줍니다.
cd /etc/nginx/sites-available
- 내 설정 파일 생성
sudo vi djangoserver {
listen 80;
server_name *.compute.amazonaws.com;
charset utf-8;
client_max_body_size 128M;
location /static {
alias /home/ubuntu/edu-django-test/static;
}
location / {
include proxy_params;
proxy_pass http://unix:/tmp/gunicorn.sock;
}
}esc → :wq 입력 후 Enter로 빠져나오기
listen 80
- 80 포트로 들어오면 웹 서버를 만날 수 있음
- HTTP의 기본 포트는 80 포트
- 설정 파일 적용 하기
- 작성한 django 설정 파일을 Nginx에게 등록해주는 과정이 필요
- sites-available 에 설정 목록을 만들어두고 sites-enabled 에서 실제로 적용하는 구조
cd /etc/nginx/sites-enabledsudo rm default # 기본 설정 삭제sudo ln -s /etc/nginx/sites-available/django윈도우로 치면 바로가기 링크를 만드는 것
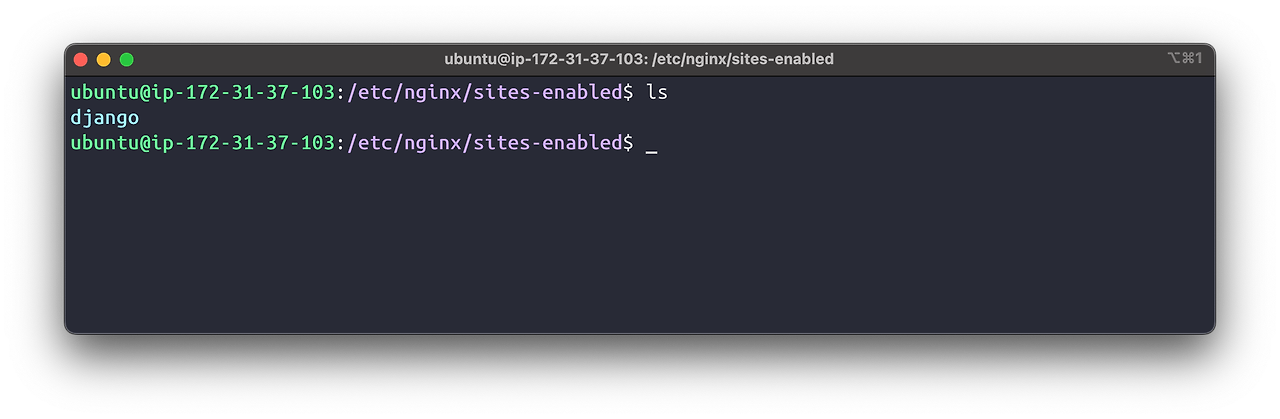
내가 작성한 설정만 남아있다 !
sudo nginx -t # 설정이 올바른지 테스트
- nignx 유저 정보 바꿔주기
sudo vi /etc/nginx/nginx.conf
Nginx 실행하기
sudo systemctl start nginxNginx 실행
sudo systemctl stop nginxNginx 중지
sudo systemctl restart nginxNginx 재시작
80 포트 열어주기

- 이제 포트번호 없이 내 ip 주소로 바로 들어가면 Nginx 설정을 만날 수 있음.

Gunicorn 서비스 설정 및 실행
이전에는 아래의 명령어를 이용해서 Gunicorn을 실행했습니다.
gunicorn --bind 0:8000 api_pjt.wsgi:application- 이 방식은 포트를 이용해서 연결하는 방식이지만, 유닉스 계열 시스템에는 소켓을 이용하는 것이 효율적인 방법입니다. (소켓으로 연결하면 좋구나 정도로만 생각해 둡시다!)
- 더구나 지금은 Shell을 종료하면 Gunicorn도 종료되어 서비스가 되지 않음
→ 서비스(service)로 등록 필요!
→ 계속해서 동작하도록 하고 AWS 서버를 재시작해도 동작해야한다!
cd /etc/systemd/systemsudo vi gunicorn.servicegunicorn 서비스 파일 생성
[Unit]
Description=gunicorn daemon
After=network.target

[Service]
User=ubuntu
Group=ubuntu
WorkingDirectory=<manage.py가 위치한 디렉토리 pwd>
ExecStart=<gunicorn이 설치된 가상환경 위치> \
        --workers 2 \
        --bind unix:/tmp/gunicorn.sock \
        <wsgi.py가 있는 디렉토리 이름>.wsgi:application

[Install]
WantedBy=multi-user.target
[Unit]
Description=gunicorn daemon
After=network.target
[Service]
User=ubuntu
Group=ubuntu
WorkingDirectory=/home/ubuntu/edu-django-test
ExecStart=/usr/bin/gunicorn \
--workers 2 \
--bind unix:/tmp/gunicorn.sock \
api_pjt.wsgi:application
[Install]
WantedBy=multi-user.target예시 코드이므로 이대로 입력하면 안된다. 내 경로를 입력하자.
다시 ip 주소로 들어가보면 👀


정적 파일도 잘 적용되었다 !
배포 마무리
개발 모드 종료하기
# SECURITY WARNING: don't run with debug turned on in production!
DEBUG = False
settings.py
- commit → push & EC2 pull !
Gunicorn 재시작
sudo systemctl restart gunicornsudo systemctl status gunicorn동작 상태 확인


이제는 내부 정보가 보이지 않는다 !
Postman 동작 확인
- 마지막으로 postman 동작을 확인해보자

- 환경 변수로 등록해서 사용해보기


'Web > Django' 카테고리의 다른 글
| Django MTM field 단점 (0) | 2024.09.23 |
|---|---|
| Django permissoin_classes (GET, POST 나누기) (0) | 2024.09.05 |
| 외부 API 연동하기 (1) | 2024.09.01 |
| Redis (1) | 2024.08.30 |
| Django ORM 최적화 (0) | 2024.08.30 |